
How To Use Carbide Wood Turning Tools: A Comprehensive Guide
Hello there, my fellow tool enthusiasts! I’m thrilled to be your guide today as we delve deep into the captivating and intricate world of carbide wood turning tools. As a seasoned woodworker myself, I’ve come to appreciate the transformative power these tools can bring to our craft. Whether you’re an experienced artisan like me, or a novice just stepping onto this path, I can assure you that mastering the use of carbide wood turning tools will significantly elevate your craftsmanship.
Carbide wood turning tools have been a game-changer in my woodworking journey. They’ve brought a level of precision and durability that I had never experienced before. These tools aren’t just about making our work easier, they’re about empowering us to transform each piece of wood into a work of art. They allow us to carve intricate designs, create smooth finishes, and bring our most ambitious woodworking visions to life.
But, like any powerful tool, carbide wood turning tools need to be handled with knowledge and care. To truly harness their full potential, it’s crucial to understand how to use them properly. And that’s exactly what I’m here to help you with.
In this comprehensive guide, I’ll be sharing my personal experiences and professional tips on how to use carbide wood turning tools. I’ll take you through every step of the process – from setting up your workspace to maintaining your tools. I’ll share the techniques that have worked for me, common pitfalls to avoid, and how to troubleshoot issues you may encounter along the way.
I’ll also share insights on how to choose the right carbide wood turning tools for your specific projects, and how to care for them so they serve you well for years to come.
So, let’s roll up our sleeves and embark on this enlightening journey together! By the end of this guide, you’ll be well-equipped to use carbide wood turning tools with confidence and skill, and I can’t wait to see the incredible creations you’ll craft with them. Let’s get started!

Suggested Reading:How To Drill A Hole In Glass With A Regular Drill Bit :In 5 Quick Steps
What are Carbide Wood Turning Tools?
Before I guide you through the hands-on aspects of using carbide wood turning tools, it’s crucial to first understand what these tools are and why they’ve become such an integral part of my woodworking repertoire.
Carbide wood turning tools are specialized woodworking tools that I depend on for a multitude of tasks, such as carving, shaping, and turning wood. The unique feature of these tools is their cutting edge, crafted from a sturdy material known as tungsten carbide. This material is incredibly hard—far harder than traditional steel—and maintains its sharpness for an impressively extended period. This means I spend less time sharpening my tools and more time crafting beautiful pieces of work.
The evolution of carbide wood turning tools is a captivating tale in the history of woodworking. Traditional wood turning tools, while effective, required frequent sharpening and a certain level of skill to use effectively. However, the game changed with the introduction of carbide-tipped tools in the mid-20th century. Suddenly, woodworkers like me were equipped with a tool that not only stayed sharp longer but was also easier to master. This innovation broadened the scope of wood turning, inviting a wider audience to participate and enabling more people to explore their creativity and work more efficiently.
In my toolkit, you’ll find several types of carbide wood turning tools, each designed for specific tasks:
- Carbide Turning Chisels: These are my go-to tools for general shaping and turning. They come in different shapes—square, round, and diamond—to accommodate a variety of turning needs.
- Carbide Hollowing Tools: These tools have a curved neck, which allows them to reach into areas that straight tools can’t. They’re my perfect companion for hollowing out bowls or vases, and I find myself reaching for them quite often.
- Carbide Detailing Tools: These tools have a pointed tip, which is great for adding fine details or reaching tight corners. They’re essential for when I want to add those finishing touches that really make a piece stand out.
- Carbide Parting Tools: I use these to cut off finished work from the rest of the wood blank. They’re a crucial part of the process, ensuring a clean and smooth finish.
Understanding the different types of carbide wood turning tools and their uses is the first step towards mastering their use. But this is just the beginning. In the upcoming sections, I’ll share more about my personal experiences, tips, and tricks for using each of these tools effectively. I’ll also cover how to choose the right tool for your project, how to maintain your tools to ensure they last, and how to troubleshoot common issues you may encounter along the way.
So, stick around! There’s a lot to learn, and I’m thrilled to share my knowledge and passion for carbide wood turning tools with you. Let’s continue this enlightening journey together!
Why Choose Carbide Wood Turning Tools?
As a seasoned woodworker and tool enthusiast, I’ve had the privilege of working with a wide array of tools throughout my career. However, when it comes to wood turning, carbide tools have consistently proven to be my trusted companions. Let’s explore why I choose carbide wood turning tools and the unique advantages they offer over other types of wood turning tools.
Carbide wood turning tools bring a host of benefits to the table, making them a preferred choice for both professional woodworkers and hobbyists like myself:
- Longer Edge Retention: One of the standout features of carbide is its hardness, significantly surpassing that of steel. This means carbide tools maintain their sharpness for a much longer period. This reduces the frequency of sharpening, allowing me to focus more on my craft and less on tool maintenance.
- Ease of Use: Traditional turning tools require a specific technique and angle to cut effectively. In contrast, carbide tools are far more forgiving, capable of cutting wood at any angle. This makes them easier to use, especially for beginners who are still honing their technique.
- Versatility: Carbide tools come in a variety of shapes and sizes, offering greater versatility in the types of cuts and finishes I can achieve. Whether I’m working on a delicate piece that requires intricate detailing or a larger project that needs robust shaping, there’s a carbide tool for the job.
- Durability: Carbide tools are incredibly durable and resistant to wear. They’re designed to withstand the rigors of woodworking, ensuring they last longer and provide good value for money.
When compared to other types of wood turning tools, carbide tools stand out for their ease of use and longevity. Traditional high-speed steel (HSS) tools, for example, require regular sharpening and a certain level of skill to use effectively. While they can be great for certain applications, they don’t offer the same level of convenience and durability as carbide tools.
Diamond turning tools, another popular choice, are excellent for detailed work but lack the versatility of carbide tools. They also tend to be more expensive and less durable in the long run, making them less suitable for everyday use.
While each type of wood turning tool has its place and purpose, carbide wood turning tools offer a balance of durability, ease of use, and versatility that makes them an excellent choice for woodworkers of all skill levels. Whether you’re just embarking on your woodworking journey or looking to upgrade your existing toolkit, I can’t recommend carbide wood turning tools enough. Their performance and reliability have made a significant difference in my work, and I’m confident they’ll do the same for you. So, give carbide wood turning tools a try and experience the difference for yourself!
Essential Carbide Wood Turning Tools for Every Woodworker
As a dedicated woodworker and tool enthusiast, I can’t overstate the importance of having the right tools at your disposal. It’s a game-changer. Carbide wood turning tools, with their unparalleled durability and versatility, are a must-have for any serious woodworker. Let’s delve deeper into the various types of carbide wood turning tools that I regularly use and their specific applications.
Carbide Turning Chisels
Carbide turning chisels are some of the most frequently used tools in my workshop. They’re my go-to for a wide range of shaping and turning tasks. The cutting edge of these chisels is made from tungsten carbide, a material that maintains its sharpness far longer than traditional steel tools. This means I spend less time sharpening and more time creating beautiful pieces of work.
There are different types of carbide turning chisels that I use, each designed for a specific task:
- Square Carbide Turning Chisels: These are my trusty tools for making square or flat cuts. Whether I’m creating a flat surface or crafting square corners, these chisels are up to the task.
- Round Carbide Turning Chisels: When I need to make smooth, rounded cuts, these are the tools I reach for. They’re perfect for creating bowls or any project that requires a smooth, curved surface.
- Diamond Carbide Turning Chisels: These chisels have a pointed tip, which is great for adding fine details or reaching tight corners. They’re essential for when I want to add those finishing touches that really make a piece stand out.
Carbide Hollowing Tools
Carbide hollowing tools are another essential tool in my woodworking toolkit. These tools have a curved neck, which allows them to reach into areas that straight tools can’t. They’re my perfect companion for hollowing out bowls or vases, and I find myself reaching for them quite often.
There are several types of carbide hollowing tools that I use, each designed for a specific task:
- Standard Carbide Hollowing Tools: These are my go-to tools for general hollowing tasks. They have a straight shaft and a carbide tip, making them perfect for creating large, smooth hollows.
- Swan Neck Carbide Hollowing Tools: These tools have a curved neck, which allows them to reach into tight or curved spaces. They’re my preferred tool when I’m working on a piece with a narrow opening or a deep hollow.
Understanding the different types of carbide wood turning tools and their uses is the first step towards mastering their use. But this is just the beginning. In the upcoming sections, I’ll share more about my personal experiences, tips, and tricks for using each of these tools effectively. I’ll also cover how to choose the right tool for your project, how to maintain your tools to ensure they last, and how to troubleshoot common issues you may encounter along the way.
So, stick around! There’s a lot to learn, and I’m excited to share my knowledge and passion for carbide wood turning tools with you. Let’s continue this enlightening journey together!
Perhaps Its time to get a new pair of Clamps. Check out Best Impact Driver Clamps.
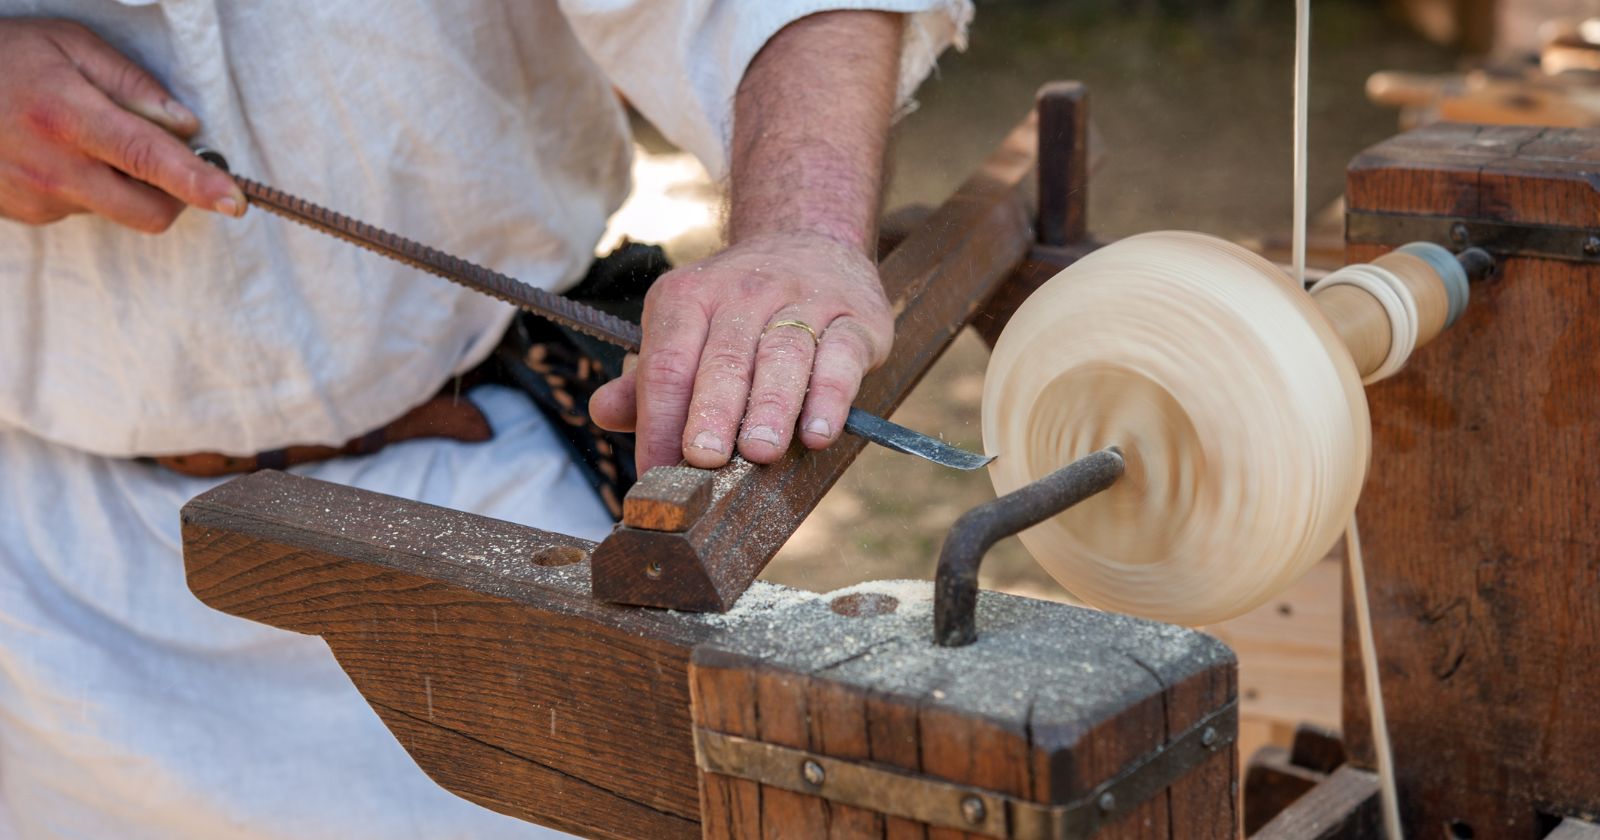
How to Use Carbide Wood Turning Tools
Now that I’ve covered what carbide wood turning tools are and why they’re an essential part of my woodworking toolkit, it’s time to dive into the practical side of things. In this section, I’ll guide you through my step-by-step process on how to use carbide wood turning tools effectively and safely.
Before we start, let me remind you that safety is paramount when working with any power tools. I always make sure to wear appropriate safety gear, including safety glasses, hearing protection, and a dust mask. I also ensure my work area is well-lit and free of any unnecessary clutter. Lastly, I always respect my tools and use them responsibly. It’s a mantra that I live by: “Respect your tools, and they’ll respect you.”
Step-by-Step Guide on Using Carbide Wood Turning Tools
- Secure the Wood: I start by securing the wood blank on my lathe. I make sure it’s tightly fastened and balanced. Unbalanced wood can cause the lathe to vibrate excessively, making it difficult to work. I’ve learned the hard way that taking the time to secure the wood properly can save a lot of trouble down the line.
- Choose the Right Tool: I select the appropriate carbide tool for the task at hand. If I’m shaping the wood, a carbide turning chisel might be the best choice. For hollowing tasks, a carbide hollowing tool would be more suitable. Over the years, I’ve built up a collection of different tools, so I always have the right tool for the job.
- Position the Tool Rest: I position the tool rest close to the wood, leaving just enough space for my tool to move freely. The tool rest helps stabilize my tool and reduces the risk of catches. It’s a simple step, but it’s crucial for maintaining control over the tool.
- Start the Lathe: I turn on the lathe and let the wood start spinning. It’s best to start at a lower speed and gradually increase it as needed. I’ve found that starting slow gives me more control and makes the process safer.
- Begin Turning: I hold the tool firmly and place it on the tool rest. I slowly move the tool towards the spinning wood. Remember, the cutting edge should be at the centerline of the wood or slightly above. Never below. This is a key point that I always keep in mind to ensure smooth and efficient cutting.
- Apply Gentle Pressure: I apply gentle pressure and let the tool do the work. There’s no need to force the tool into the wood. The sharp carbide edge will cut the wood efficiently with light pressure. It’s a lesson I learned early on: let the tool do the work.
- Move the Tool Smoothly: I move the tool smoothly along the wood. The motion should come from my body, not just my arms. This helps maintain control and produces a smoother cut. It’s like a dance, and with practice, you’ll find the rhythm that works best for you.
- Check My Progress: I stop the lathe periodically to check my progress. This gives me a chance to inspect the work, adjust my approach if necessary, and take a break. Woodworking is a marathon, not a sprint, and taking breaks is essential to maintain focus and prevent fatigue.
- Finish the Piece: Once I’m satisfied with the shape and smoothness of my piece, I can stop the lathe and remove the piece. Now I’m ready to sand and finish my piece as desired. The feeling of seeing a finished piece that I’ve crafted with my own hands never gets old.
Remember, practice makes perfect. Don’t be discouraged if your first few attempts don’t turn out as expected. With time and practice, you’ll get the hang of it. I’ve been doing this for years, and I’m still learning and improving. So, keep at it, and most importantly, enjoy the process. Happy turning!
Step-by-Step Guide on Maintaining Your Carbide Wood Turning Tools
- Clean Your Tools After Each Use: After I finish a turning session, I make it a point to clean my tools. I remove any wood chips or dust from the tool using a soft brush or cloth. This prevents any buildup that could affect the tool’s performance. It’s a simple step, but it goes a long way in keeping your tools ready for the next use.
- Inspect the Cutting Edge: I regularly inspect the cutting edge of my tools for any signs of wear or damage. Carbide tips are incredibly durable, but they can still wear down over time. If the cutting edge looks dull or worn, it’s time to rotate the cutter or replace the tip. Regular inspections can help you spot issues early and keep your tools in the best condition.
- Rotate the Cutter: One of the great things about carbide tools is that the cutters can be rotated to expose a fresh cutting edge. I do this whenever I notice the tool isn’t cutting as efficiently as it should. This simple step can significantly extend the life of my cutters and ensure that I’m always working with a sharp edge.
- Replace the Cutter When Necessary: Eventually, even carbide cutters wear out. When this happens, I replace the cutter with a new one. It’s a simple process that involves loosening a screw, removing the old cutter, and installing the new one. Having a few spare cutters on hand can save you time and keep your work flowing smoothly.
- Handle and Store Your Tools Properly: I always handle my tools with care and store them properly when not in use. I keep them in a dry, secure place to protect them from damage and moisture, which can lead to rust. Proper storage also helps to keep your tools organized and easy to find when you need them.
- Regularly Check the Tool Handle: The handle of the tool is just as important as the cutter. I regularly check my tool handles for any signs of wear or damage. If a handle is cracked or damaged, it can be a safety hazard, so it’s important to replace it as soon as possible. A good handle provides a comfortable grip and better control over the tool, so don’t overlook its importance.
Remember, your tools are an investment. Taking the time to maintain them will pay off in the long run with better performance and longer tool life. So, keep those tools in tip-top shape, and they’ll serve you well. Happy turning!
Troubleshooting Common Issues
Just like any journey, my experience with carbide wood turning tools has had its fair share of bumps along the road. But let me tell you, every challenge is an opportunity to learn and grow. In this section, I’ll share some of the common issues I’ve faced while using carbide wood turning tools and how I’ve tackled them head-on.
Torn Grain or Rough Surface
One of the most frequent issues I’ve encountered is ending up with torn grain or a rough surface finish after turning. This often happens due to the scraping action of carbide tools, which can be a bit more aggressive on the wood fibers compared to traditional high-speed steel (HSS) tools.
To counter this, I’ve learned to take lighter cuts and ensure that the tool is presented to the wood at the correct angle. I’ve also found that using a shear cutting technique, where the tool is presented to the wood at a slight angle, can result in a smoother surface. And of course, never underestimate the power of good old sanding to achieve that smooth finish. I usually start with a coarser grit sandpaper and gradually move to finer grits for the best results.
Rapid Cutter Wear
Despite carbide being a very hard material and generally outlasting HSS, it can still wear down over time. This is especially true when turning harder woods or if the tool is not used correctly.
Regular inspection of the cutter is my secret weapon here. If I notice that the cutter isn’t performing as efficiently as it should, I rotate it to expose a fresh cutting edge. Eventually, the cutter will need to be replaced, but regular rotation can significantly extend its life. It’s also important to remember that different woods can have different effects on your cutter. Harder woods can cause more wear and tear, so take this into account when planning your projects.
Difficulty in Sharpening
Sharpening carbide tools can be a bit of a challenge, especially when compared to HSS tools. This is because carbide is a much harder material.
While carbide cutters do stay sharp for a long time, they will eventually need to be sharpened or replaced. I use a diamond sharpening stone to touch up the edges of my carbide cutters. However, if the cutter is too worn or damaged, I replace it with a new one. It’s a simple process that involves loosening a screw, removing the old cutter, and installing the new one.
Tool Catches
Tool catches can occur if the tool is presented to the wood at an incorrect angle or if the tool is forced into the wood too aggressively.
To prevent tool catches, I always ensure that the tool is on the tool rest before it contacts the wood and that it is at the correct height (the cutting edge should be at the centerline of the wood or slightly above). I also make sure to use gentle pressure and let the tool do the work rather than forcing it into the wood. It’s all about finesse, not force.
Remember, every woodworker encounters issues along the way. The key is to learn from these experiences and continually improve your skills. With practice and patience, you’ll become more proficient and confident in using your carbide wood turning tools. So, keep turning and keep learning! And remember, the only real mistake is the one from which we learn nothing. So, let’s keep learning and turning together!

FAQs: How to Use Carbide Wood Turning Tools: A Comprehensive Guide
As we wrap up this comprehensive journey into the world of carbide wood turning tools, I thought it would be helpful to address some of the questions that I frequently get asked. These questions often revolve around key aspects of using and maintaining carbide wood turning tools, and I hope my answers will provide you with some additional insights that will enhance your woodworking journey.
How often should I sharpen my carbide wood turning tools?
One of the reasons I love carbide wood turning tools is their long-lasting sharpness. However, the frequency of sharpening really depends on how often I use my tools and the type of wood I’m working with. Harder woods can dull the cutter faster. As a general rule, if I notice my tool isn’t cutting as efficiently as it should, it’s usually time to rotate the cutter to a fresh edge or give it a touch-up with a diamond sharpening stone.
Can I use carbide wood turning tools as a beginner?
Absolutely! In fact, I often recommend carbide wood turning tools to beginners due to their ease of use. Unlike traditional tools, carbide tools don’t require a complex sharpening process, which can be a steep learning curve for those just starting out. Plus, the simple ‘position and feed’ technique used with carbide tools is easier to master.
What safety measures should I take when using carbide wood turning tools?
Safety is always my top priority when working with any power tools. Here are some safety measures I always keep in mind:
- Always wear appropriate safety gear, including safety glasses, hearing protection, and a dust mask.
- Ensure your work area is well-lit and free of any unnecessary clutter.
- Always respect your tools and use them responsibly. Never force the tool into the wood; instead, let the tool do the work.
- Regularly inspect your tools for any signs of wear or damage. If a tool is damaged, I don’t use it until it’s been properly repaired or replaced.
Remember, woodworking is a rewarding hobby and profession, but it’s essential to always prioritize safety. So, let’s keep turning, but let’s do it safely!
Conclusion
Well, here we are, my fellow tool enthusiasts, at the end of our enlightening journey into the world of carbide wood turning tools. We’ve traversed the landscape of understanding what these tools are, why they’ve earned a special place in my toolkit, and the unique advantages they bring to our woodworking projects. We’ve also navigated the practical aspects of using and maintaining these tools, and even troubleshooting some common issues. It’s been quite an adventure!
Throughout this journey, I’ve shared with you why I believe carbide wood turning tools are a game-changer in the woodworking world. Their unparalleled precision, impressive durability, and ease of use are hard to match. But, like any tool, they require proper use and care to deliver their best performance.
But the most important takeaway, I hope, is that with a bit of knowledge, a dash of practice, and a healthy dose of patience, anyone—I mean anyone—can master the art of using carbide wood turning tools. Whether you’re a seasoned woodworker like me, or a beginner just starting your journey, I hope this guide has armed you with the confidence and knowledge to make the most of these fantastic tools.
Remember, every master was once a beginner. Every piece of art started as a simple block of wood. And every journey begins with a single step. So, why not let that step be picking up a carbide wood turning tool and seeing where it takes you? Embrace the process, enjoy the journey, and let your creativity flow.
As we wrap up this guide, I want to encourage you to embrace the journey of learning and discovery that comes with woodworking. Don’t be afraid to make mistakes—they’re just stepping stones to success. Ask questions—curiosity is the engine of achievement. And keep learning—knowledge is the wing whereby we fly to heaven.
So, go ahead, pick up that carbide wood turning tool, and let’s create something beautiful together. Let’s push the boundaries of what’s possible with wood. Let’s continue to learn, to grow, and to create. I can’t wait to see where your journey takes you. Remember, the world is but a canvas to our imagination. So, let’s paint something beautiful on it. Happy turning!
More Tools Resources:
Before You Go Off And Start Creating Something With Your New Found Information Check Out These Guides Below


