
Top 4 Things To Make With Lathe Wood Tools
Hello there, my fellow tool enthusiasts! Today, I’m taking a deep dive into the realm of creativity and craftsmanship, armed with my trusty lathe wood tools. If you’ve ever found yourself daydreaming about the various Things To Make With Lathe Wood Tools, then you’ve stumbled upon the right corner of the internet.
In my eyes, lathe wood tools are the unsung heroes of the woodworking world. Their versatility and reliability are unmatched, and their ability to morph a simple block of wood into a stunning masterpiece never ceases to amaze me. Whether you’re a seasoned professional with years of experience under your belt or a DIY hobbyist like myself, just starting to explore the vast landscape of woodworking, these tools are a game-changer. They open up a universe brimming with possibilities, enabling you to create everything from functional household items to intricate decorative pieces that are sure to turn heads.
In this guide, I’ll be walking you through some of the most exciting and rewarding Things To Make With Lathe Wood Tools. I’ll share my experiences, the challenges I faced, and how I overcame them, all in the hope that it inspires you to embark on your own woodworking journey.
So, it’s time to don our safety goggles, roll up our sleeves, and dive into the world of woodturning. Whether you’re looking to craft a beautiful wooden bowl, a custom pen, or even a unique piece of jewelry, I’m here to guide you every step of the way. Let’s get turning!

Understanding Lathe Wood Tools
Before I take you on a journey through the thrilling Things To Make With Lathe Wood Tools, it’s crucial to first understand what these tools are and the indispensable role they play in the world of woodworking.
At their core, lathe wood tools are devices that have empowered me to shape wood into a myriad of forms and designs. They operate by spinning a piece of wood around a horizontal axis, while I employ sharp tools to cut, sand, knurl, drill, or otherwise modify the wood. The true charm of lathe wood tools, and the Things To Make With Lathe Wood Tools, lies in their capacity to create precise, symmetrical designs – a feat that would be incredibly challenging to achieve by hand.
The history of lathe wood tools is a fascinating one, spanning thousands of years. The earliest incarnations were simple, hand-operated devices. Over the centuries, these tools have undergone significant evolution, with modern lathes now powered by electricity and boasting a range of features that render them more versatile and user-friendly. It’s a testament to human ingenuity and our relentless pursuit of efficiency and precision, all in the quest to create more Things To Make With Lathe Wood Tools.
There are several types of lathe wood tools, each designed for specific woodworking tasks. These include:
- Spindle Gouges: I often reach for these when I’m working on detailed designs on smaller pieces. They have a shallow flute and are perfect for crafting intricate designs that require a delicate touch.
- Bowl Gouges: These are my go-to when I’m turning large bowls and other similar projects. They possess a deeper flute and a thicker shaft, providing the sturdiness and control needed for larger pieces.
- Scrapers: These are invaluable for smoothing out the wood’s surface. They come in various shapes and sizes, each suited to different tasks and types of wood.
- Parting Tools: I use these to cut off the workpiece from the rest of the wood. They create a small, narrow cut, allowing me to separate my finished project without causing any damage.
- Skew Chisels: These are my secret weapon for smoothing and shaping. They have a skewed edge, which allows for precise cuts and a smooth finish that’s hard to achieve with other tools.
By understanding these tools and their specific uses, I’ve been able to navigate my woodworking projects with a greater level of confidence and skill. In the next sections, I’ll share some of the amazing things you can create with these tools, from the simple to the complex, the functional to the purely decorative. So, stick around, and let’s embark on this woodworking journey together!
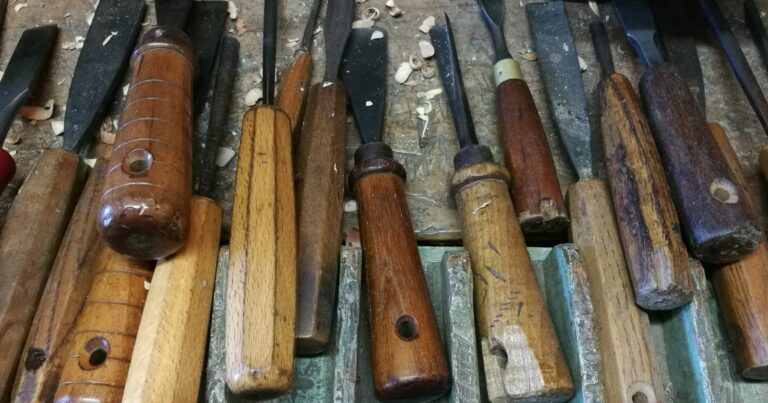
Essential Lathe Wood Tools for Your Workshop
When it comes to woodworking, I’ve found that having the right tools in my workshop is like having the right ingredients in a recipe – it can truly make or break the outcome. After countless hours spent crafting with lathe wood tools, I’ve developed a deep appreciation for each tool’s unique role and value in the process. Here’s my personal rundown of the essential lathe wood tools that I believe should grace every workshop:
- Chisels: These are my go-to tools in any lathe wood tool set. They come in a variety of shapes and sizes, each designed for a specific task. Whether I’m carving intricate details, shaping large pieces of wood, or adding finishing touches, a reliable set of chisels is a must-have. They’re like the trusted friends I can always count on.
- Gouges: I use these for cutting and shaping wood. Their curved cutting edge allows for a smooth cut, making them my ideal companions for creating bowls, spindles, and other rounded objects. It’s like they were made to bring my visions of curves and contours to life.
- Parting Tools: True to their name, I use these to part off my finished work from the rest of the wood. They’re designed to make a narrow cut, minimizing waste and ensuring a clean finish. It’s like having a precise surgeon’s scalpel in my tool kit.
- Skew Chisels: These are my secret weapon for smoothing and shaping. Their skewed edge allows for precise cuts, making them perfect for adding those final touches to my work. They’re the artists of my tool set, adding finesse and detail to every piece.
- Bowl Gouges: These have a deeper flute and a thicker shaft, making them my top choice for turning large bowls and other similar projects. They’re the heavy lifters, handling the bigger tasks with ease and precision.
- Scrapers: I use these for smoothing out the wood’s surface. They come in various shapes and sizes to suit different tasks. They’re like my personal cleanup crew, ensuring every piece is smooth and ready for finishing.
Each of these tools plays a crucial role in my woodworking projects, and understanding their functions has greatly enhanced my crafting experience. When I choose my tools, I consider factors like quality, price, and user reviews. I’ve learned that the most expensive tool isn’t always the best. I look for tools that offer a good balance of quality and affordability.
I also make it a point to read user reviews. They can provide valuable insights into the tool’s performance and durability. And of course, I always ensure that the tools I choose are suitable for the type of projects I plan to undertake.
In the next section, I’ll be sharing some safety measures to keep in mind when using these tools. After all, a safe workshop is a happy workshop. So, stick around!
Safety Measures When Using Lathe Wood Tools
As much as I relish the thrill of embarking on a new project with my lathe wood tools, I’m an unwavering advocate for safety first. Working with these tools can be an absolute delight, but it’s crucial to remember that they can pose dangers if not handled correctly. Here are some key safety measures that I never compromise on when using lathe wood tools:
- Wear Protective Gear: This is my golden rule. Whenever I’m engrossed in work with lathe wood tools, I ensure I’m wearing safety goggles to shield my eyes from any flying wood chips and dust. I also don sturdy gloves to safeguard my hands, and if the project is particularly noisy, I make sure my ears are protected too. And let’s not forget a dust mask – it’s essential for preventing the inhalation of fine wood particles that can be harmful to the lungs.
- Maintain a Clean Workspace: A cluttered workspace is an accident waiting to happen. I make it a point to keep my workspace spick and span and organized, ensuring there are no loose items that could trip me up or interfere with my work. I also make sure that my work area is well-lit, because good lighting is key to safety and precision. Additionally, I keep a first aid kit handy at all times – you never know when you might need it.
- Regularly Inspect Tools for Damage: Before I kickstart any project, I take a moment to inspect my tools for any signs of damage. This includes checking for any cracks in the handles of my chisels and gouges, ensuring that all parts of my lathe are secure and functioning as they should, and making sure that all cutting edges are sharp. Working with damaged or dull tools can be a shortcut to accidents and less than perfect work. I also make it a point to regularly clean and oil my tools to keep them in top shape.
- Use the Right Tool for the Job: Each lathe wood tool is designed with a specific task in mind. Using the wrong tool can not only lead to a less-than-perfect outcome, but it can also be a safety hazard. I always ensure I’m using the right tool for the task at hand. And remember, forcing a tool to do a job it’s not designed for is a surefire way to damage the tool and potentially cause an accident.
- Don’t Rush: Woodworking is a craft that demands patience. I never rush through a project, as haste can lead to mistakes and accidents. I take my time, savor the process, and always prioritize safety over speed. I also make sure to take regular breaks to avoid fatigue, which can lead to mistakes.
Remember, no project is worth compromising your safety. By adhering to these safety measures, you can relish your time working with lathe wood tools while keeping the risk of accidents at bay. Stay safe, stay focused, and enjoy the rewarding process of crafting with lathe wood tools!
Watch This Video And Learn About Thing To Make With Lathe Wood Tools.
Suggested Reading: Knipex Pliers Wrench vs Adjustable Wrench
Things To Make With Lathe Wood Tools
One of the aspects I absolutely adore about working with lathe wood tools is the sheer diversity of items I can bring to life. From practical pieces like bowls and pens to decorative gems like candle holders and jewelry, the possibilities are as vast as your imagination. Let’s dive into some of my personal favorite projects:
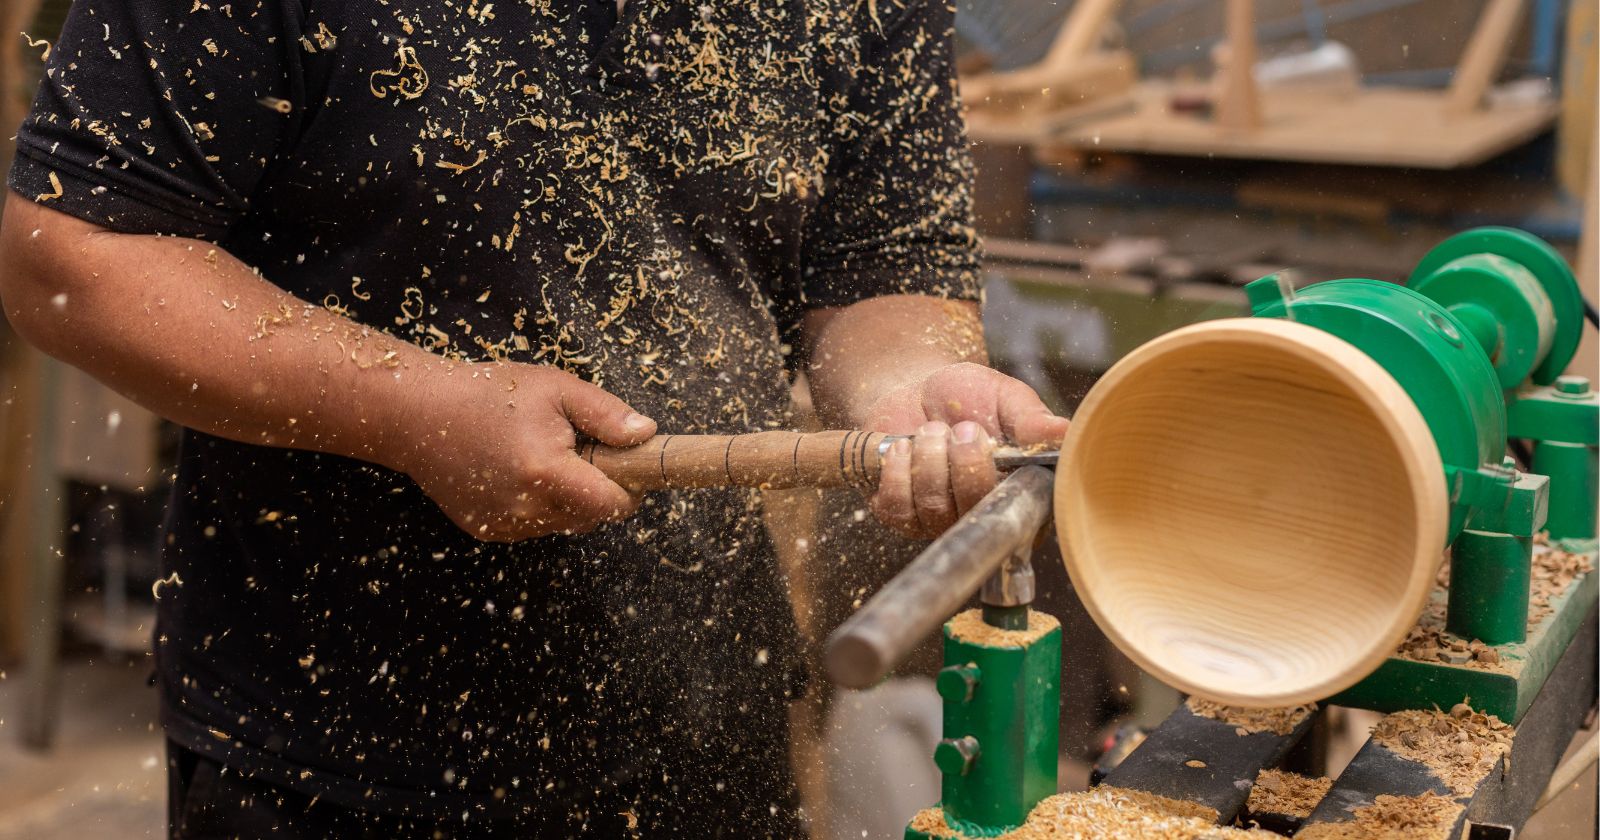
Bowls and Vases
Crafting bowls and vases with lathe wood tools is a process that’s as rewarding as it is creative. Here’s how I go about it:
- Select the Right Wood: My journey begins with choosing a piece of wood that’s just right for turning. I often find myself drawn to hardwoods like oak, maple, and walnut due to their durability and the beautiful grain patterns they flaunt.
- Shape the Wood: Armed with my trusty bowl gouge, I start shaping the wood into the desired form. This involves removing the bulk of the material to form the basic shape, then refining it until I’m thrilled with the result.
- Finish the Piece: Once I’m satisfied with the shape, I embark on the journey to a smooth finish. Starting with coarse sandpaper and gradually working my way up to finer grits, I sand the piece until it’s as smooth as silk. I then apply a finish to protect the wood and enhance its natural beauty.
Throughout the process, I always keep an eye out for opportunities to add unique touches to my pieces. This could be anything from incorporating natural defects in the wood to adding decorative elements like grooves or beads.
Pens
Creating custom pens with lathe wood tools is a project that’s as fun as it is practical, yielding beautiful results. Here’s my process:
- Choose the Wood: The first step is to choose a suitable piece of wood. I have a soft spot for woods with interesting grain patterns or colors, as these can make the pen more visually appealing.
- Shape the Pen: Using my spindle gouge, I shape the wood into the desired form. This involves turning the wood down to the correct diameter, then adding any desired details like grooves or beads.
- Finish the Pen: Once I’m happy with the shape, I sand the pen to a smooth finish and apply a suitable finish to protect the wood and enhance its appearance.
Candle Holders
Making unique candle holders with lathe wood tools is a project that allows for a lot of creativity. Here’s how I approach it:
- Design the Candle Holder: I start by sketching out a design for the candle holder. This could be a simple, minimalist design or something more ornate, depending on my mood.
- Shape the Wood: Using my lathe wood tools, I shape the wood to match my design. This involves turning the wood to the correct diameter, then adding any desired details like grooves, beads, or other decorative elements.
- Finish the Piece: Once I’m satisfied with the shape, I sand the piece to a smooth finish and apply a suitable finish to protect the wood and enhance its appearance.
Jewelry
Crafting beautiful wooden jewelry with lathe wood tools is a project that requires precision and attention to detail. Here’s how I do it:
- Design the Jewelry: I start by sketching out a design for the piece. This could be a simple pendant, a pair of earrings, or a bracelet.
- Shape the Wood: Using my lathe wood tools, I shape the wood to match my design. This involves turning the wood to the correct size, then adding any desired details like grooves, beads, or other decorative elements.
- Finish the Piece: Once I’m happy with the shape, I sand the piece to a smooth finish and apply a suitable finish to protect the wood and enhance its appearance.
Remember, the secret to creating beautiful pieces with lathe wood tools is a blend of patience and practice. Don’t be disheartened if your first few attempts don’t turn out as expected. Keep trying, and you’ll soon be creating stunning pieces that you can be proud of. Happy crafting, folks!

Troubleshooting Common Problems with Lathe Wood Tools
Even for a seasoned tool enthusiast like me, running into issues while working with lathe wood tools is part of the journey. But fret not, most of these problems have simple solutions. Here are some common hiccups I’ve encountered while using lathe wood tools, along with my personal tips on how to tackle them:
Tool Chatter
Tool chatter is a common issue that can lead to rough finishes and can even damage your tools. It usually rears its head when the tool isn’t properly supported against the wood, causing it to vibrate or ‘chatter’.
I make sure my tool rest is as close to the workpiece as possible and that my tool is resting securely on it. Also, I ensure that I’m using the correct tool for the job and that it’s sharp. I’ve learned the hard way that a dull tool requires more force to cut, which can lead to chatter.
Rough Finishes
If you’re getting a rough finish on your workpiece, it could be due to a number of factors, including a dull tool, incorrect tool use, or even the type of wood you’re using.
I always ensure my tools are sharp before I start turning. I make sure I’m using the correct tool for the job and that I’m using it correctly. If I’m still getting a rough finish, I try using a scraper to smooth out the surface, followed by sanding.
Wood Cracking or Splitting
Wood cracking or splitting can be a frustrating problem. This usually happens when the wood dries out too quickly, causing it to crack or split.
To prevent this, I try sealing the end grain of the wood as soon as I cut it. This slows down the drying process and helps prevent cracking and splitting. If I’m turning green wood, I consider rough turning my piece first, then letting it dry before I do the final turning.
Burn Marks
Burn marks are usually caused by friction, often from the tool being held in one place for too long or from sanding with a grit that’s too coarse.
I keep my tools moving when they’re in contact with the wood, and avoid pressing too hard. When sanding, I start with a coarser grit and work my way up to a finer one, making sure to remove all scratches from the previous grit before moving on to the next.
Sanding Across the Grain
Sanding across the grain can lead to a rough finish and is a common mistake made by many woodworkers.
Always sand along the grain, not across it. This will help you achieve a smoother finish and prevent unnecessary scratches on your workpiece.
Lack of Lubrication
Any parts that move, whether it’s your wood lathe or a bicycle, need timely lubrication. If the parts are not lubed properly, it can lead to problems.
Regularly lubricate all moving parts of your lathe to ensure smooth operation and prevent wear and tear.
Damaged Tool Rest
Hardened woodturning tools can damage the tool rest over time. Catches, which can occur when turning a wood bowl, can lift and smack a bowl gouge or scraper against the tool rest, causing damage.
Regularly inspect your tool rest for any signs of damage. If you notice any, replace it immediately to prevent accidents and ensure accurate turning.
Remember, every problem has a solution. Don’t get discouraged if you run into issues. Instead, see them as learning opportunities. Keep turning, and keep learning!

Suggested Reading: The 3 Best Knipex Pliers Wrench
FAQs: Thing To Make With Lathe Wood Tools
As we wrap up our exploration of the world of lathe wood tools, I thought it would be helpful to address some of the most frequently asked questions I’ve encountered over the years. Whether you’re a seasoned woodworker or a beginner just starting out, these answers should provide some valuable insights into the craft. So, let’s dive in!
What are the best woods to use with lathe wood tools?
The best wood to use with lathe wood tools largely depends on the project you’re working on. However, some woods are generally easier to work with and provide better results. For beginners, I recommend starting with softer woods like pine or poplar as they’re easier to shape and less likely to cause tool chatter. For more advanced projects, hardwoods like oak, maple, and walnut are excellent choices due to their durability and beautiful grain patterns.
How do I maintain my lathe wood tools?
Maintaining your lathe wood tools involves regular cleaning, sharpening, and storage. After each use, clean your tools to remove any wood chips or dust. Regularly sharpen your tools to ensure they’re always ready for the job – a dull tool can lead to rough finishes and even accidents. Finally, store your tools in a dry, clean place to prevent rust and damage.
What safety measures should I take when using lathe wood tools?
Safety should always be your top priority when using lathe wood tools. Always wear protective gear, including safety goggles, sturdy gloves, and ear protection if necessary. Keep your workspace clean and organized to prevent accidents. Regularly inspect your tools for any signs of damage before use. And of course, always use the right tool for the job. Remember, no project is worth risking your safety.
Conclusion
Well, there you have it, my fellow tool enthusiasts! We’ve journeyed together through the world of lathe wood tools, exploring the endless possibilities they offer. From crafting bowls and vases to designing pens, candle holders, and even jewelry, these tools have opened up a world of creativity for me, and they can do the same for you.
But let’s remember, the projects I’ve shared are just a starting point. The real joy of working with lathe wood tools comes from exploring your own creativity, coming up with your own designs, and seeing them come to life right before your eyes. So, don’t be afraid to experiment and try new things. Who knows, you might just create the next woodworking masterpiece!
However, as we dive into our creative endeavors, let’s not forget the importance of safety. I always make sure to wear my protective gear, keep my workspace clean, and regularly inspect my tools for any signs of damage. And of course, I always use the right tool for the job.
So, what are you waiting for? It’s time to grab your lathe wood tools, roll up your sleeves, and create something amazing. I can’t wait to see what you come up with.
And remember, every woodworker, no matter how experienced, started somewhere. So, don’t get discouraged if your first few projects don’t turn out as expected. Keep practicing, keep learning, and most importantly, keep enjoying the process. Because at the end of the day, it’s not just about the final product, but also about the journey of creation.
So, go ahead, unleash your creativity, and let the world see your craftsmanship. And as you embark on this exciting journey, remember that I’m here to guide you every step of the way. So, stay tuned for more tips, tricks, and insights into the world of woodworking. Until then, happy turning!
More Tools Resources:
Here Are A Few More Guides To Help You A long Your Building Journey

