How Do You Know If Wood Is Dry Enough To Split
You Know When Wood Is Dry Enough To Split
To determine if wood is adequately dried for splitting, inspect the log ends. Look for a darker hue and the presence of cracks, which indicate dryness. Seasoned wood, being drier, is lighter than its wet counterpart and produces a resonant sound when two pieces are struck together. The presence of any green tint or difficulty in removing the bark suggests that the wood has not fully dried yet.
Ah, the sweet scent of freshly chopped wood! There’s something undeniably satisfying about it, isn’t there? Hello, fellow woodworkers and enthusiasts, welcome to another hearty discussion at impactdriverdrill.com. Today, I will be diving into a topic that’s often glossed over but is crucial for all of us who find solace in the rhythmic sound of an axe splitting wood: How do you know if wood is dry enough to split?
On this journey today, I will explore the science behind wood drying, the telltale signs of adequately seasoned wood, and some common myths that might have misled us in the past. So, grab your favorite cuppa, and let’s dive into the woody details together, ensuring that the next time you’re faced with a stack of logs, you’ll know precisely how to ensure they’re ready for splitting and burning.

Suggested Reading: Best Portable Dust Collector System Under $500
Understanding Wood Moisture Content
Ah, moisture content, the unseen culprit behind many a splitting headache pun absolutely intended! Let’s dive into the nitty-gritty of what’s happening inside the beloved logs before they grace our fireplaces, shall we?
The Science Behind Wood Drying
Now, I’ve always been fascinated by the natural processes that wood undergoes, and drying is one of those marvels that’s easy to overlook. When a tree is felled, it’s like a water reservoir on stilts. A freshly cut log can be made up of more than 50% water! And as you might have guessed, that’s a bit too soggy for our splitting and burning endeavors.
Wood dries in two primary phases: first, the free water the water in the cell cavities evaporates, and then the bound water the water within the cell walls begins to make its exit. This process is influenced by various factors like temperature, humidity, and air circulation. Ever noticed how a log left out in the summer sun dries quicker than one in a damp, shaded area? That’s the science of wood drying in action!
But why does this matter, you ask? Well, the drying process directly impacts the wood quality. Dry wood is easier to split, burns more efficiently, and is less prone to mold and decay. It’s like the difference between trying to light a fresh piece of bread on fire versus a crisp toast. One will give you a cozy, crackling fire, while the other…well, let’s just say it’s a smoky situation.
Why Dry Wood Matters
Now, I’ve had my fair share of encounters with wet wood, and let me tell you, it’s not a fun time. Using wood that isn’t dry enough is akin to trying to fry an egg on a cold skillet it’s possible, but it’s going to take a lot more time and energy.
Firstly, burning wet wood is highly inefficient. It demands a lot more heat to burn, meaning you’re getting less bang for your buck in terms of heat output. Your cozy, warm room might just remain a distant dream with wet wood in the fireplace.
And let’s talk safety. Burning wet wood creates more creosote, a sticky, flammable substance that accumulates in your chimney. The more creosote you have, the higher the risk of a chimney fire. And trust me, a chimney fire is one spectacle you do NOT want to witness.
Moreover, wet wood is a party venue for molds and fungi. Store it improperly, and you might just be inviting some unwanted guests to your woodpile.
In the upcoming sections, I will dive deeper into identifying the signs of adequately dried wood and how to store it properly to maintain its quality. Stick with me, and let’s ensure that your next wood-burning experience is efficient, safe, and thoroughly enjoyable!

Suggested Reading: The 3 Best Drills Under $ 100
Identifying Dry and Wet Wood: A Visual Guide
Navigating through stacks of logs, it’s a common dilemma I’ve all faced: Is this wood dry enough? Is that log too wet? Fear not, my fellow lumber enthusiasts, for today, I am going to unravel the mysteries of identifying the moisture content of wood just by looking at it!
Characteristics of Dry Wood
Ah, the allure of perfectly seasoned wood, a true spectacle for any wood-burning aficionado! But how do we identify these prized logs amidst the pile? Here are a few telltale signs:
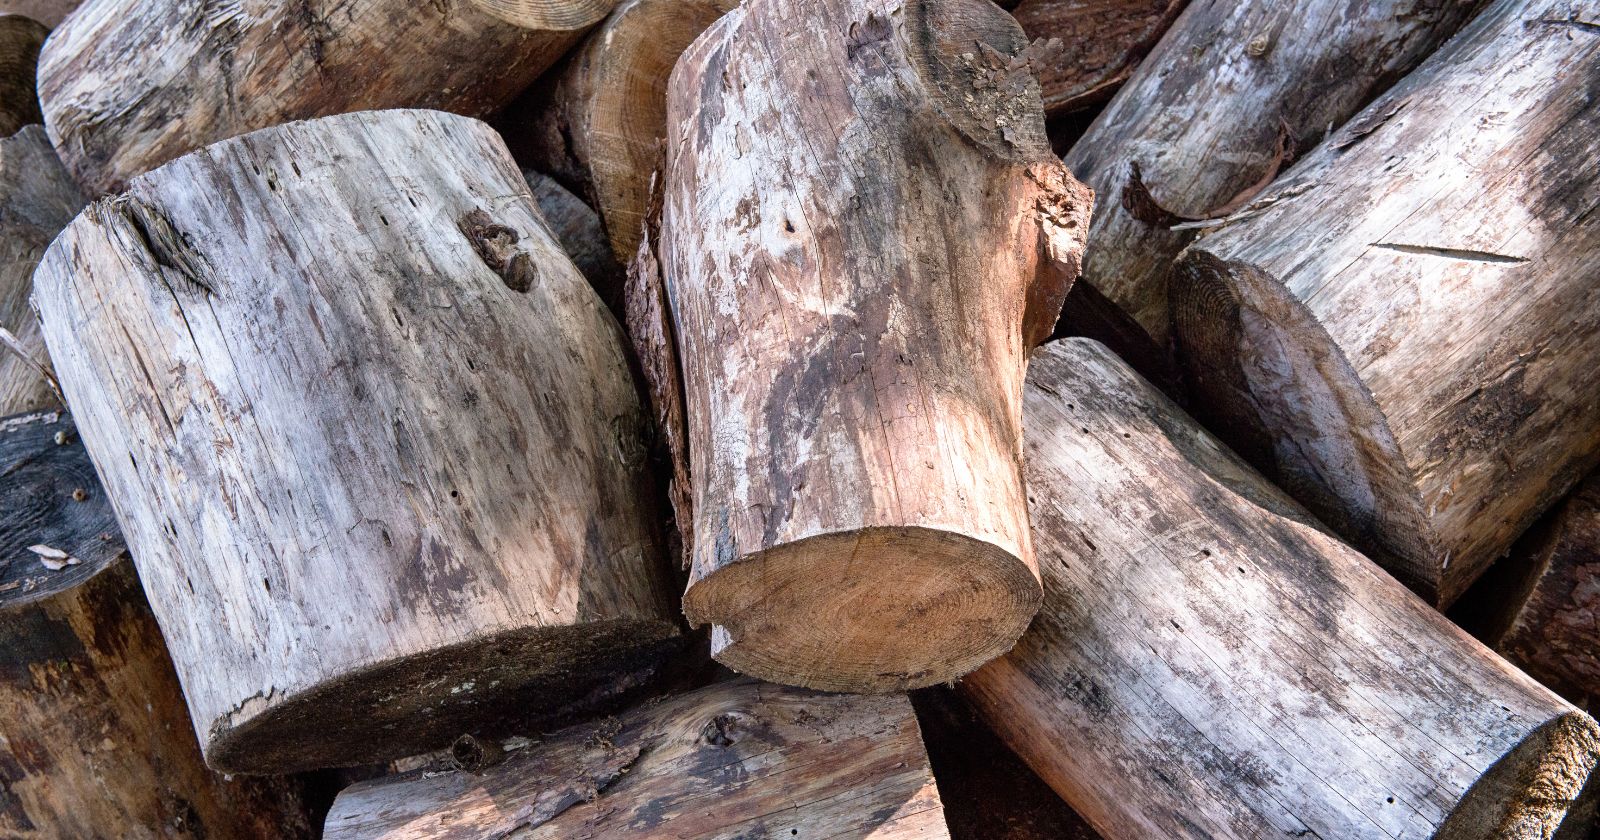
- Color: Dry wood tends to be lighter in color compared to its wet counterpart. It has a certain faded, often grayish hue that speaks volumes about its low moisture content.
- Cracks: Check for radial cracks at the ends of the logs. These beautiful patterns aren’t just aesthetically pleasing; they’re a clear indicator that the wood has lost a significant amount of moisture.
- Bark Peeling: A log that’s easy to debark or has loose, peeling bark is often a good sign that it’s been drying for quite some time.
- Sound: When struck together, dry logs produce a sharp, crisp “clink” rather than a dull thud. It’s like the wood is singing the song of its dryness!
Signs That Your Wood is Too Wet
On the flip side, wet wood has its own set of characteristics that scream “Not ready yet!” Let’s delve into a few:
- Weight: Wet wood is noticeably heavier. If you pick up a log and it feels like you’re lifting weights at the gym, it’s probably too wet.
- Color: Fresh, wet wood tends to be darker and looks, well, moist. It lacks the faded charm of its dry counterpart.
- Texture: Run your hands over the wood. Does it feel damp? If yes, it’s back to the drying stack for this log!
- Sound: Remember the crisp clink of dry wood? Wet wood will greet you with a dull, muffled sound instead.
Common Mistakes in Identifying Wood Moisture
Now, even seasoned pun intended! Woodworkers can sometimes misjudge wood moisture. Let’s address a few common misconceptions:
- Assuming All Split Wood is Dry: Just because wood is split doesn’t automatically mean it’s dry. It might dry faster, but always check for other indicators.
- Judging by External Wetness: Rain-soaked wood might appear wet on the outside but could be adequately dry inside. Don’t dismiss a log just because it’s weathered by a storm!
- Relying Solely on Color: While color is a good indicator, different wood species can trick you with their natural hues. Always use color in conjunction with other signs.
Embarking on this woody journey, it’s crucial to arm ourselves with the knowledge to discern between wood that’s ready to burn and wood that needs more time to season. In our next sections, I’ll explore the tools and techniques to ensure your wood is just the right kind of dry. Stick around, and let’s keep the fire of knowledge and our fireplaces burning brightly!

Suggested Reading: Best Heavy-Duty 1/2-Inch Impact Wrench Under $300
Tools and Techniques to Ensure Your Wood is Dry Enough
Ah, the tools of the trade! There’s nothing quite like having the right gadgets and know-how to ensure our wood is perfectly primed for the fire. Today, dear readers, I am going to explore some of the tools and techniques that have saved me from the despair of wet wood and ensured many a cozy, crackling fire.
Using a Moisture Meter
Now, if you’re a gadget lover like me, you’re going to adore using a moisture meter. This nifty little device takes the guesswork out of determining wood dryness and gives you a straightforward answer: is it dry or not?
- Step 1: Insert the probes. Stick the meter’s probes into the wood, ensuring they go into the wood grain, not against it.
- Step 2: Read the results. A reading of 20% or lower? You’ve got yourself some nicely dried wood!
- Step 3: Check multiple spots. Wood can be tricky, so ensure to check a few different spots to get an accurate reading.
- Step 4: Adjust for temperature. Some meters require you to adjust for the wood’s temperature, so keep that manual handy!
The “Sound” Technique
Ah, the symphony of seasoned wood! Believe it or not, your ears can be one of your best tools in determining wood dryness.
- Listen: Dry wood has a distinct, crisp sound when knocked together. It’s like a hearty applause for your wood-burning efforts!
- Compare: Knock two pieces of wood together and listen. Then compare that sound with known dry and wet wood if possible.
- Practice: This technique might take a bit of practice, but soon you’ll be identifying dry wood with a simple clink!
The Feel Technique
Now, let’s talk about getting handsy with our wood. Experienced woodworkers often swear by the “feel” technique to gauge moisture content.
- Weight: As we’ve discussed, wet wood is significantly heavier than dry wood. Lift and compare to get a sense of its moisture level.
- Texture: Run your hands over the wood. Dry wood should feel, well, dry!
- Temperature: Sometimes, wet wood can feel colder to the touch compared to dry wood.
Navigating through the world of wood drying can be a bit daunting, but with the right tools and techniques, you’ll be seasoned yes, I’m still enjoying that pun expert in no time! In our next sections, we’ll delve into the art and science of splitting wood, ensuring you’re well equipped to handle your logs with confidence and expertise.
Watch This Video And Learn About How do you know if wood is dry enough to split
Safety First: Gear and Precautions
Speaking of safety, let’s dive a bit deeper into ensuring our wood-splitting adventures remain incident-free.
- Eye Protection: Wood chips can fly in unexpected directions. Always wear safety goggles.
- Footwear: Sturdy, closed-toe shoes or boots can protect your toes from any misguided logs or tools.
- Gloves: Protect your hands from splinters and improve your grip with a good pair of gloves.
- Clear Area: Ensure your splitting area is clear of tripping hazards and that you have ample space to swing safely.
- Know Your Limits: If a piece of wood isn’t splitting, it’s okay to set it aside and try again later or with a different tool.
Splitting wood is both a science and an art, requiring the right tools, techniques, and safety precautions to master. But with a bit of practice and adherence to these tips, you’ll be splitting logs with ease and safety in no time!
In our next section, I’ll explore the nuances of storing and seasoning your wood properly, ensuring that your meticulously split logs provide the maximum heat and enjoyment in your cozy abode. Stick around, and let’s keep those fires burning safely and efficiently!

Storing and Seasoning Your Wood Properly
Ah, the delicate art of storing and seasoning wood! It’s like aging a fine wine, isn’t it? Welcome back, dear readers, to another cozy section where I’ll dive into ensuring that your carefully split wood reaches its peak potential, providing you with the warmest and most efficient fires.
The Ideal Conditions for Wood Seasoning
Seasoning wood is akin to a spa retreat for your logs, where they shed their excess moisture and emerge ready to burn brightly and efficiently. The best spa, erm, seasoning conditions include:
- Sunlight: Much like us soaking up the rays on a sunny day, wood loves a good sunbath. A spot where it can bask in ample sunlight is ideal.
- Airflow: Good air circulation is crucial to whisk away the moisture released from the wood.
- Off the Ground: Elevating wood prevents it from absorbing moisture from the ground and encourages even drying.
Storing Tips for Quicker Drying
Now that we’ve established the ideal conditions, let’s talk about some tips to expedite the drying process.
- Proper Stacking: Ensure your wood is stacked in a way that allows air to circulate freely among the logs.
- Location: Choose a spot that gets plenty of sun and is shielded from prevailing winds to avoid moisture from rain and snow.
- Covering Wood: Protect the top of your woodpile from the elements, but leave the sides exposed to allow for airflow.
- Space Between Stacks: If you’re storing multiple stacks, ensure there’s enough space between them for air to circulate.
Troubleshooting Common Seasoning Issues
Even with the best intentions, sometimes issues arise during the seasoning process. Let’s troubleshoot a few common problems.
- Mold: If you notice mold on your wood, it’s often a sign of poor air circulation or excessive moisture. Reevaluate your storage conditions and restack if necessary.
- Pests: Bugs love making homes in woodpiles. Regularly inspect and consider using pest deterrents to protect your wood.
- Uneven Drying: If some logs are drying faster than others, consider restacking to ensure all logs are exposed to optimal conditions.
Seasoning and storing wood might seem like a straightforward task, but ensuring optimal conditions and addressing any issues promptly can be the difference between a roaring, efficient fire and a smoky, frustrating experience.
In the next section, I’ll tackle some FAQs and provide additional resources to turn you into a wood-burning connoisseur. Stick with me, and let’s continue our journey into the warm, wonderful world of wood-burning
FAQs: How Do You Know If Wood Is Dry Enough To Split
Navigating through the world of wood splitting and seasoning, we all encounter a few stumps along the way wood pun intended!. It’s natural to have queries and seek clarity amidst the forest of information available. So, let’s address some of the frequently asked questions that often arise among our community of wood enthusiasts and lumberjacks.
How Long Does It Take for Wood to Be Properly Seasoned?
Ah, the classic question of patience! The time it takes for wood to be properly seasoned largely depends on the type of wood and the conditions in which it’s stored. Generally speaking, most hardwoods require at least 6 months to a year to season properly when stored in optimal conditions – think sunny, airy, and dry. Softwoods might be ready a bit sooner. Remember, the key to perfect seasoning lies in providing ample sunlight, good air circulation, and protection from external moisture.
Can I Burn Freshly Cut Wood?
While freshly cut, or green, wood can technically be burned, it’s not something I’d recommend. Burning green wood is less efficient as the fire has to evaporate the moisture before it can effectively burn the wood, leading to more smoke and a less hearty fire. Plus, it contributes to creosote buildup in your chimney, which can be a fire hazard. Patience is a virtue, my friends! Allow your wood to season properly for a cleaner, safer, and more efficient burn.
How Do I Protect My Seasoned Wood from Pests?
Bugs and critters do love a cozy woodpile! To protect your seasoned wood from pests, consider these tips: Store your wood off the ground and away from direct contact with vegetation to make it less accessible. Regularly inspect your woodpile for signs of infestation and consider using natural deterrents, like cedarwood chips or sprays, to keep the critters at bay. Remember, a clean, well-maintained woodpile is your best defense against pesky invaders!

Wrapping Up Our Wood-Splitting Wisdom
And there I have it, dear lumber lovers, a comprehensive journey through the enchanting world of wood-splitting and seasoning! From understanding the subtle art of drying wood, identifying its readiness, choosing our tools wisely, mastering the split, to ensuring it’s stored just right I’ve navigated through the forest of knowledge together, and oh, what a journey it’s been!
Now, it’s over to you, my fellow wood enthusiasts! I encourage you to share your wood-splitting tales, tips, and perhaps, any wood-related wisdom you’ve gathered along your lumberjack journeys. Have a quirky wood-splitting anecdote or a seasoned I can’t resist a good pun! tip? Do share it with our community in the comments below.
Until our next woody adventure, keep those axes sharp, the logs splitting, and the fires burning brightly!